 There is no shortage of techniques for clearing a stoppage or malfunction; just trying to explain the difference between the two sets off a never ending debate. Unfortunately, those who have time to engage in never ending debates lose track of what is important. You’re fighting for your life. Whatever works is what is important.
Stoppages usually occur in the cycle of operation of the semiautomatic pistol or rifle, usually caused by a dirty, un-lubricated weapon, bad magazines (covered in a previous article) under powered ammunition, poor grip (including unlocking the wrist while shooting). There are other contributing factors, but these are the primary ones.
A malfunction relates to a mechanically broken weapon that usually cannot be fixed on short notice. I would like to deal with the stoppage techniques in this article.
First, prevention or at least steps we can take to prevent this from happening are important, but please keep in mind there are no guarantees. It is hard to believe that in 2010 the primary cause of stoppages is still dirty, un-lubricated firearms. With all the training and preaching about the importance of cleaning and maintaining our weapons systems many of our fellow officers continue to not take this seriously. A properly maintained and lubricated firearm following the manufacturer’s guidelines is as important to you and those that rely on you as understanding sound tactics and techniques to survive a firefight on the street.
Every time a firearm is taken apart, cleaned, lubricated, and put back together, you should perform a function check. Often at the beginning of a training class I will have the students unload, make the weapon safe and perform a function check. I am often surprised by the number of officers that have been “trained” and carrying the firearm for some time that still do not know how to properly perform a function check on their side arm or a shoulder mounted weapon they may be using. While specific firearms require specific manipulation for a weapon-specific function check, general guidelines for a function check will be covered in a later article.
Inspection of duty ammo as we load our magazines is as equally important. The primary objective is to keep our weapons at peak operational readiness so when we draw the firearm we are confident it will go BANG! (Preventative maintenance guide coming soon.)
So, let’s move on to some more terms such as slide forward, slide to the rear, primary stoppage, secondary stoppage, etc. Slide (or bolt on a semi-automatic rifle or shotgun) forward means that the slide or bolt is all the way forward in the normal locked (firing) position but the weapon did not go BANG! Slide (or bolt) to the rear means that the slide is locked to the rearward position. Primary stoppage means that when you pressed the trigger you heard or felt a hammer / striker fall. Secondary stoppage means that when you pressed he trigger you did not hear or feel a hammer / striker fall.
First, if you have to press the trigger and the weapon doesn’t go “BANG!”, your first immediate action is to MOVE!, preferably toward cover, but if none is available, remember that a moving target is harder to hit than a stationary one.
Reload:
If the indicators are:
(1) Slide or bolt locked to the rear, AND
(2) no hammer or striker fall, chances are that the weapon is empty and needs to be reloaded.
The fix is to reload the weapon and get back into the fight! Sounds simple enough, but how many times have you seen in training shooters; (a) catch an empty magazine, (b) place an empty magazine in a pocket, etc.? If you need to continue shooting, the most important thing is to get the fresh magazine into the weapon and chamber a round. The empty magazine is worthless!
Also, some shooters practice the method of pointing the muzzle of the semiautomatic pistol straight up and flipping it in their hand so the magazine well points out at a ninety degree angle. The theory is that you can see the opening of the magazine well out of your peripheral vision or “combat window” and are less likely to fumble a reload. I can’t say that I’m a big fan of this technique, as pointing the muzzle straight up on a semiautomatic pistol with the slide locked to the rear tells the whole world (including, possibly, your assailant(s)) that YOU’RE EMPTY. I’ve also seen shooters that get the steps wrong and flip the pistol to the ninety degree angle before pressing the magazine release, and then wonder why the magazine doesn’t fall out. (Sir Isaac Newton figured this out a few centuries ago.) I prefer to keep the muzzle pointed at the threat / threat area with the magazine well pointed down while executing the reload.
Primary Method of Stoppage Clearing:
If the indicators are:
 (1) Slide or bolt forward, AND
(2) hammer or striker fall, your primary method of immediate action is to:
(a) TAP and TUG on the magazine to make sure it is seated;
(b) RACK the slide or bolt,
(c) READY.
All of this should happen as you are moving and the weapon is still up, pointed toward to threat or threat area. With a semi-automatic pistol, a good “par time” for a tap, rack, ready is about 1.0 – 1.5 seconds. With a semiautomatic rifle, about 1.5 seconds. Dipping the muzzle toward the ground and staring at the weapon does nothing except alert your assailant(s) that you are out of the fight.
Secondary Method of Stoppage Clearing:
If the indicators are:
(1) Slide or bolt locked to the rear, AND
(2) no hammer or striker fall, AND
(3) When you press the magazine release, the magazine does not fall out of the weapon, you may have a failure to extract combined with a failure to feed, also known as a “double feed”. We refer to it as a “secondary stoppage”.
The traditional steps to correct this have been:
(a) LOCK the slide / bolt to the rear,
(b) RIP the magazine out,
(c) RACK the slide / bolt to clear the chamber, then
(d) TAP a new magazine into place,
(e) RACK the slide / bolt and
(f) READY.
That’s a lot of moving parts to memorize, and under low stress on the range we’ve seen a lot of shooters get the steps out of order, making the stoppage even worse.
We’ve simplified this “secondary method” into three steps that are more easily remembered under stress:
(a) UNLOAD the weapon, which usually means removing the
magazine, sometimes forcefully;
(b) CLEAR THE CHAMBER (I prefer a physical check with a fingertip
as opposed to a visual check, which assumes that you will have
sufficient light to see the chamber);
(c) RELOAD the weapon, preferably with a fresh magazine, as a faulty
magazine may have caused the stoppage in the first place.
To recap, the best way to minimize the need for stoppage clearing is to:
(a) Have your weapons clean and properly lubricated;
(b) Function test all of your magazines;
(c) Make certain that all of the cartridges in the magazines are
defect-free.
That being said, practice your stoppage drills. You can do them in any safe area that allows movement and has simulated cover. Make certain to remove all live rounds from the area and use only inert training cartridges.


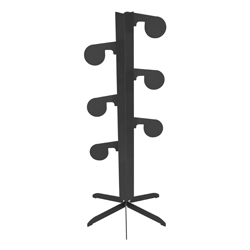

 As we learn more and more about the human dynamics involved in armed confrontations, we understand that physical skills that require conscious thought or intellectual processing tend to break down rapidly under high levels of stress. If defensive skills and responses are not programmed in at a subconscious level, the sudden stress may cause us to fumble, freeze or panic. It is in this environment that reactive shooting skills are needed. Such reflexive shooting skills can be taught through the use of extremely short time limits, thus pushing the shooter to function at the limits of reaction and response time. This can be compared to learning how to hit a fast moving ball with a bat or racket, or developing the reflexes to block a punch or kick at full speed. Reactive steel targets provide the instant feedback required to program an officer’s reflexive shooting skills effectively and efficiently.
 The basic function of the Bobber X-treme™ will probably sound familiar. A steel plate is presented to the shooter from behind cover. This plate can be hit at any time while it is exposed, and a computer interface is used to control the frequency and duration of the target exposures.
 Judgment – Split-second judgment and threat analysis may be the most important elements of the training triangle. The revolutionary Bobber X-treme™ addresses this issue by presenting the shooter with two separate target plates, one directly behind the other. One plate is an 8-inch circle, and the other is an 8-inch octagon. Depending on your training scenario, you can classify all the circle plates as hostile, and all the octagon plates as friendly. When one of the plates jumps up from behind cover, the shooter must quickly determine whether the plate is hostile or friendly and then take the appropriate action. The circles and octagons look enough alike to force the shooter to be sure.


 all normally.
 Emphasis:
 When we talk about using firearms against lethal force threats, there is only one real measure of proficiency and an endless number of pseudo measurements. I do not say that in a negative way, as pseudo measurements save a lot of wear and tear on our personnel. However, we have to remember not to substitute the pseudo measurements for the real measurement.
 Please note that I do not see any of the above as a negative. Any time you are pressing trigger and getting hits on target you are reinforcing fundamental skills, and that is a good thing.